
How to Set Up a Home Network Correctly
Identify your modem or gateway, connect your router and switch in the right order, secure Wi-Fi, place mesh nodes, and test the finished network.

 Companion video
Prefer watching? Explore the topic on video.
The short answer
One device acts as the router. Everything else connects behind it.
Got a gateway from your provider? That's a modem and router in one box.
- Internet
- Modem
- Router
- Switch + devices
A reliable home network starts with one device acting as the router. Everything else connects behind it, either directly, through an Ethernet switch, or over Wi-Fi.
For many cable and DSL connections, the correct order is:
Internet connection → modem → router → switch or household devices
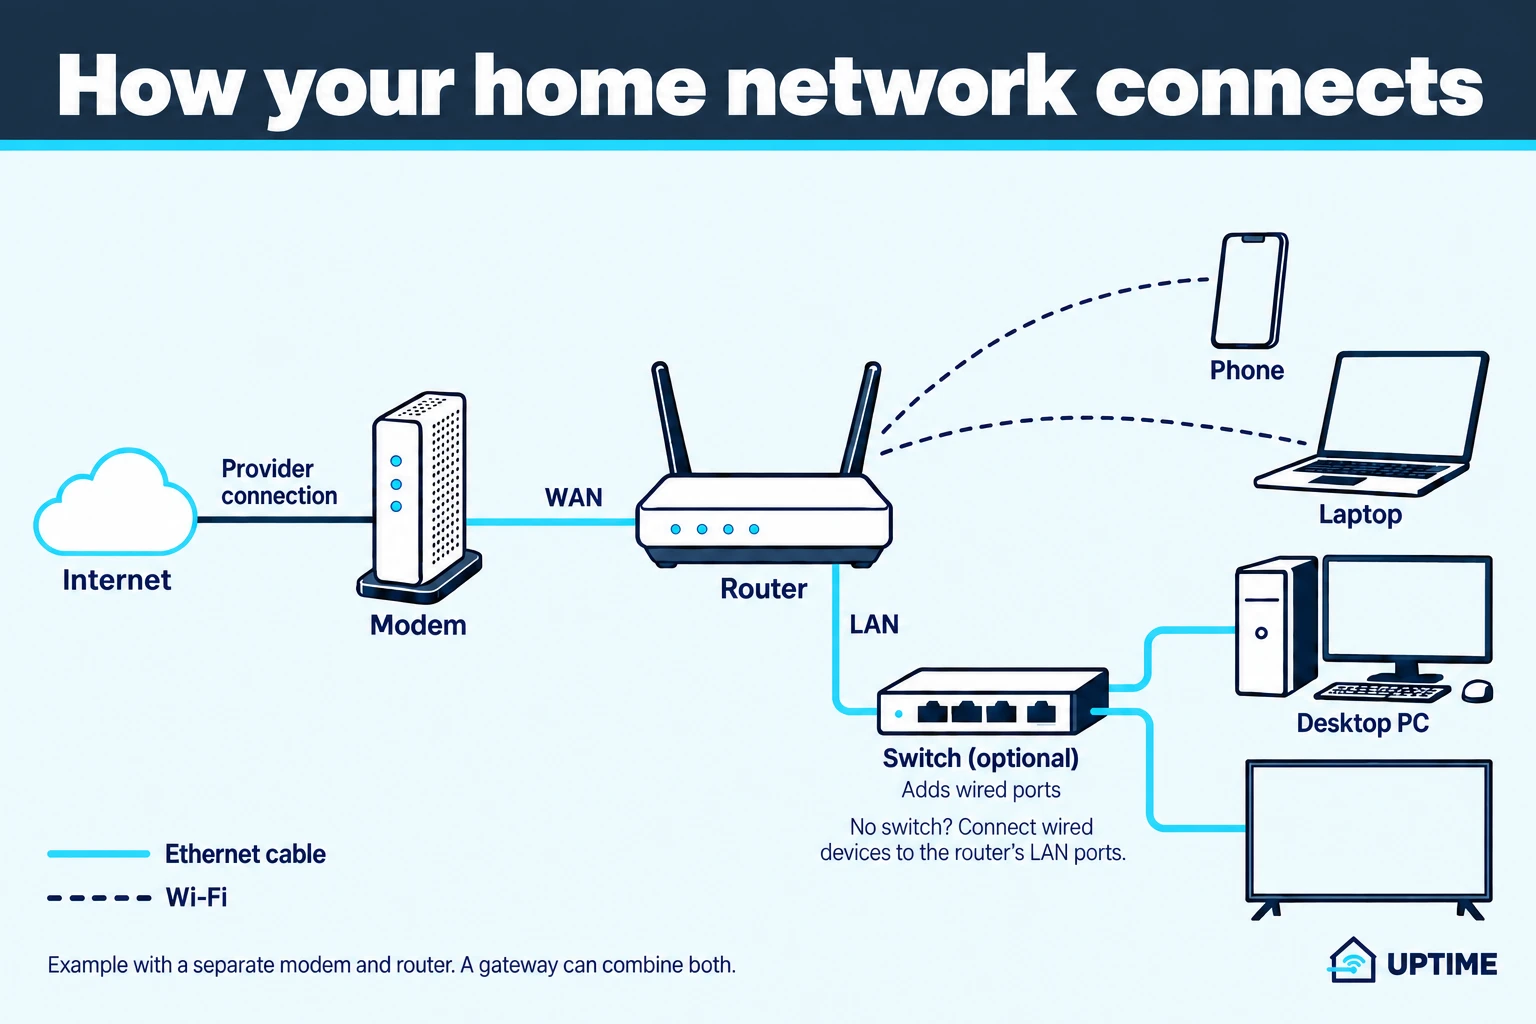
But your internet provider may have supplied a gateway, which combines the modem and router in one box. Fiber and fixed-wireless service may instead use a provider-managed connection device, such as an optical network terminal (ONT) or receiver. Identify your equipment before changing the layout.
First, identify the equipment you already have
Do not buy anything until you know what your provider installed.
Find the label on each networking box and write down:
- Manufacturer and model number
- Cables connected on the wall side
- Number and type of Ethernet ports
- Default Wi-Fi name, if shown
- Whether you own or rent the device
Then look up that exact model on your provider’s support site. Appearance and a provider-branded Wi-Fi name are not enough to identify what a box does.
The common device types include:
- Modem: Connects your home network to a compatible provider service. It normally needs a separate router.
- Router: Creates the local network used by your devices, assigns local addresses, directs traffic, and usually provides Wi-Fi.
- Gateway: Combines modem and router functions in one box. Xfinity, for example, describes its Wireless Gateway as a modem and router in one unit. Xfinity explains the distinction here.
- Provider-managed connection device: Fiber and fixed-wireless installations may use an ONT, receiver, or another service-specific device before the router. It is not necessarily a modem or gateway.
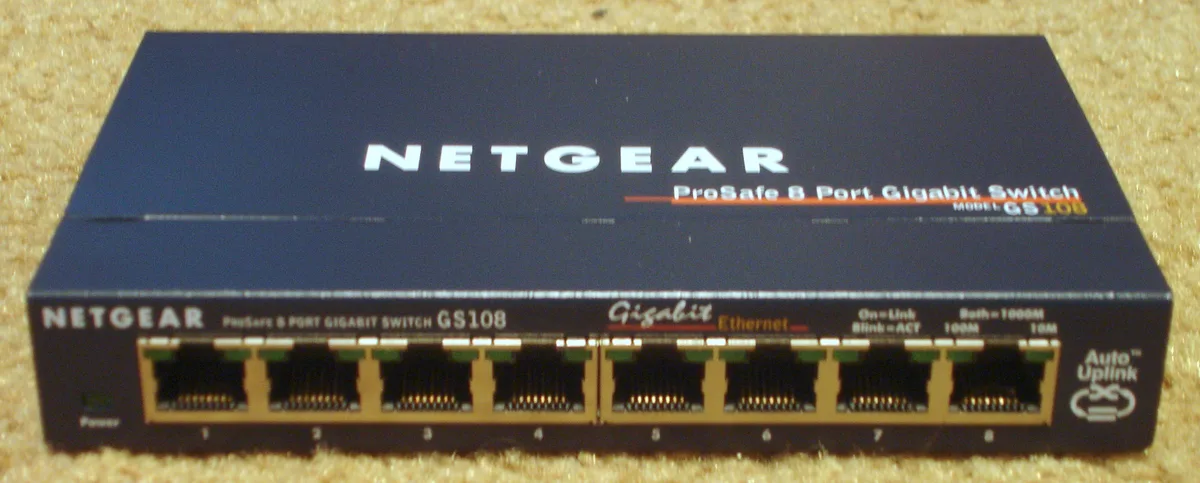
A network switch is different. It adds Ethernet ports behind your router but does not replace the router.
Do not move, bridge, reset, replace, or power-cycle an ONT, receiver, or other provider-managed device as though it were a cable or DSL modem. Follow the provider’s instructions for the exact service and model.
Choose the right layout
There is no single diagram for every home. Use the one matching your equipment.
Option 1: Use the provider gateway as your router
Internet connection → provider gateway → devices
Add an optional switch if the gateway runs out of Ethernet ports:
Internet connection → provider gateway → switch → wired devices
This is usually the simplest arrangement. Do not add another router merely to gain more Ethernet ports. Use a switch instead.
Option 2: Use a separate modem and router
Internet connection → modem → router → devices
For additional wired connections:
Internet connection → modem → router → switch → wired devices
The switch belongs behind the router. Comparable vendor topology guidance also places the modem first, routing device second, and switch after the router. Meraki documents that order.
Option 3: Use a provider-managed ONT or receiver
A common arrangement is:
Internet connection → provider-managed ONT or receiver → router → devices
The provider-managed device may have special cabling, activation, power, or service requirements. Keep it connected according to the provider’s instructions. Do not assume that settings intended for a modem-router gateway, such as bridge mode, apply to it.
Option 4: Use your own router with a provider gateway
One device still needs to be in charge of routing.
The usual choices are:
- Put the provider gateway into bridge mode, then use your router normally.
- Keep the provider gateway as the router, turn off overlapping Wi-Fi where appropriate, and put the second router or mesh system into access point mode if it supports that configuration.
Bridge mode turns off the gateway’s routing function while retaining its modem function on supported equipment. Access point mode does the opposite for the downstream device: the provider gateway continues routing, while the second device mainly supplies Wi-Fi.
These modes can disable features. Confirm the exact behavior in both devices’ manuals before choosing.
Decide what you actually need to buy
Router or mesh system
Start with one well-placed router unless you already know that one cannot cover the home.
Consider mesh when you have repeatable coverage problems caused by factors such as:
- Multiple floors
- A long or irregular layout
- Thick concrete or brick walls
- Large obstructions
- Areas that are too far from a practical router location
Home size alone does not determine how many mesh units you need. Construction, layout, interference, and the connection between mesh nodes also matter. Google lists these as mesh-planning factors.
Check compatibility before adding nodes. Mesh products from different generations or product families are not necessarily interchangeable.
Ethernet switch
Buy a switch only when you need more Ethernet ports than the router provides.
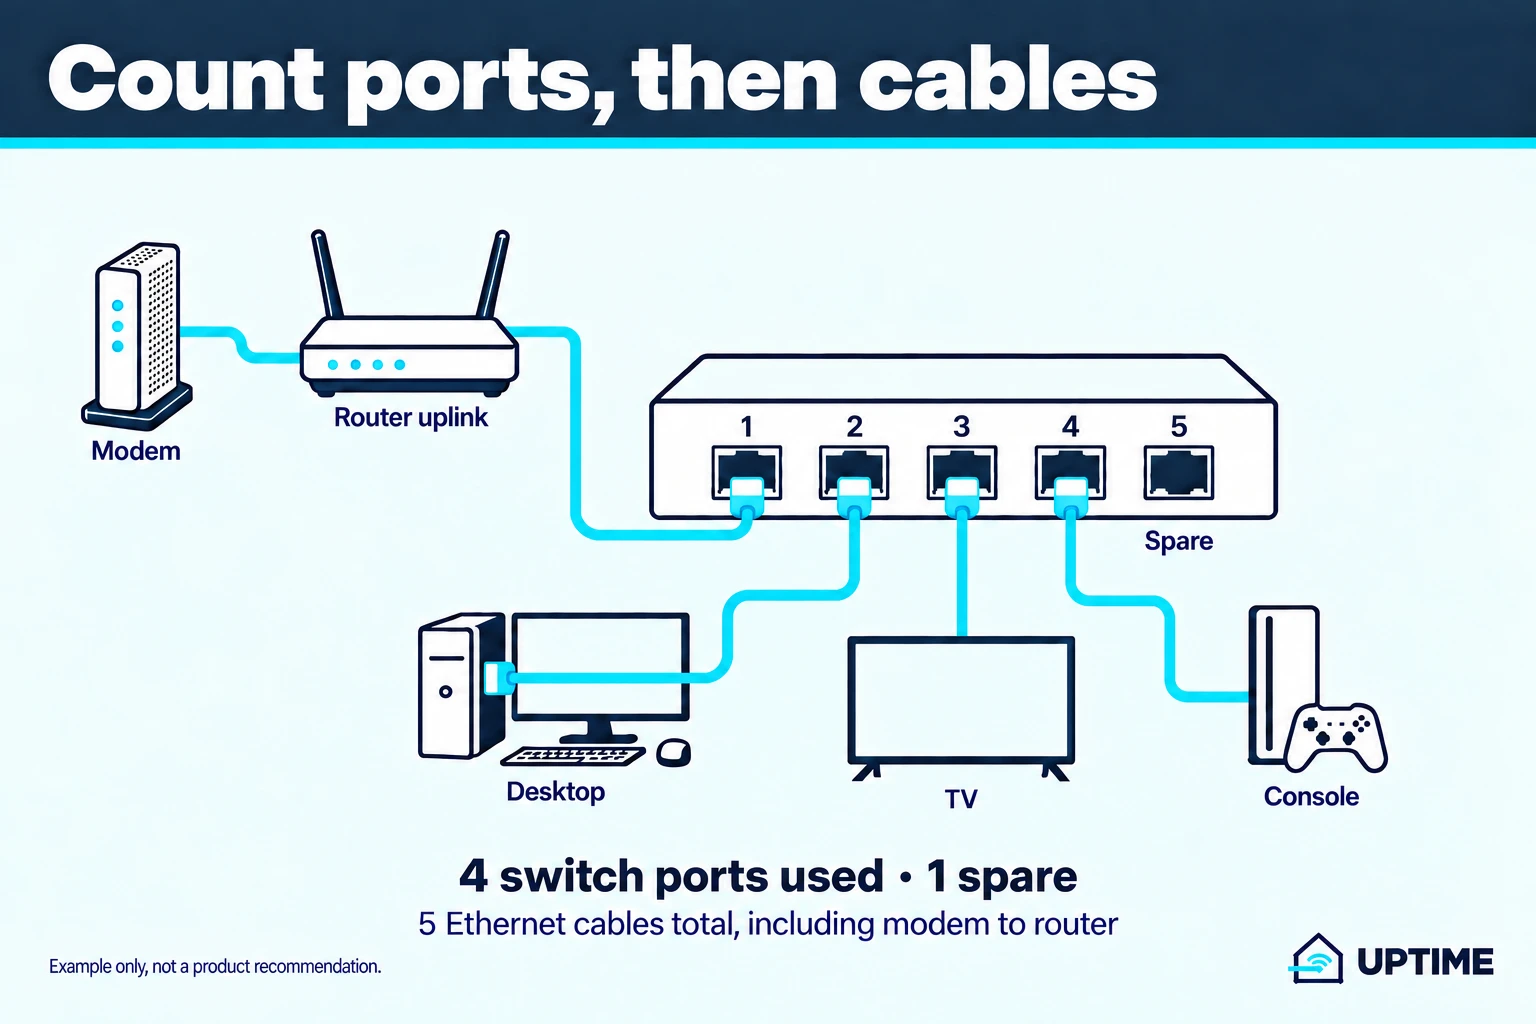
Count one port for every wired device, plus one switch port for the connection back to the router. For example:
| Connection | Switch ports used |
|---|---|
| Router uplink | 1 |
| Desktop computer | 1 |
| TV or streaming box | 1 |
| Game console | 1 |
| Total | 4 |
A basic unmanaged switch is appropriate when you only need more ports and do not need advanced business-network controls.
Ethernet cables
Cat 6 Ethernet cables are a practical choice for new household patch cables. Count one cable for every Ethernet link in your planned layout:
- One from a separate modem or bridged gateway to the router
- One from the router to a switch
- One from the router or switch to each wired device
- One for each wired mesh node or access point, if supported and used
For example, a modem-to-router link, router-to-switch link, desktop, TV, and game console require five cables total. Consider keeping one or two modest-length spare cables for troubleshooting or a future device.
Measure each route and buy the lengths you need without pulling cables tight or leaving them where they create a trip hazard.
Cable labels do not override the limits of your router, switch, or device ports. The final connection speed depends on every component in the path.
Prepare security and recovery information first
Do this before enabling bridge mode or changing network roles.
Use a trusted phone or computer that is updated, under your control, and connected locally to the network. If possible, keep a computer and Ethernet cable available for recovery.
Record or securely save:
- Provider account details
- Current Wi-Fi name and password
- Administrator address and login for each box
- Router and gateway model numbers
- Screenshots or backups of current settings
- Provider-specific connection details, if shown
- Instructions for reversing bridge or access point mode
Some DSL configurations require credentials or VLAN settings to be moved to the new router. TP-Link’s documented bridge-mode example tells users to back up both configurations and preserve PPPoE and VLAN details before changing anything. Review its example and then use instructions for your exact equipment.
Do not factory-reset provider equipment as an exploratory step. A reset can erase settings needed to reconnect.
Secure the router before adding every household device
Open the router’s app or local administration page using its official instructions. Then work through these settings:
- Change the router administrator password. This protects the settings page, not just Wi-Fi. Change the administrator username too if the router allows it.
- Install firmware updates. Enable automatic security updates when available.
- Set a new Wi-Fi name. Avoid names containing your surname, address, or other identifying information.
- Create a long, unique Wi-Fi password. Do not reuse an account password.
- Use WPA3 Personal or WPA2-AES encryption. Avoid open Wi-Fi, WEP, WPA, and TKIP settings.
- Disable internet-facing remote management unless you specifically need it.
- Disable WPS. WPS is the push-button or PIN-based shortcut for joining Wi-Fi.
- Review UPnP. Universal Plug and Play can automatically open connections for devices and applications. CISA recommends disabling it when it is not needed.
These steps follow CISA’s home Wi-Fi security guidance.
If your router offers an isolated guest network, use it for visitors. CISA also recommends it for smart-home devices that need only internet access. A smart device that must communicate directly with a phone, hub, printer, or local server may not work on an isolated guest network, so check its requirements first.
Store the new administrator and Wi-Fi credentials in a password manager or another secure location before continuing.
Configure bridge mode only when it is needed
You do not need bridge mode when the provider gateway will remain your only router. You also do not need it merely to add a switch.
Bridge mode becomes relevant when you want your own router to perform routing behind a modem-router gateway.
Use this sequence:
- Confirm that your provider supports bridge mode on the exact gateway model.
- Check what provider features will stop working.
- Save settings and any required connection credentials.
- Confirm how to reverse the change, including whether recovery requires Ethernet.
- Enable bridge mode using the provider’s instructions.
- Connect the gateway’s active Ethernet port to the internet or WAN port on your router.
- Complete the router’s setup process.
- Confirm internet access before connecting the rest of the home.
Procedures and restrictions vary. On supported Xfinity gateways, bridge mode disables routing and private Wi-Fi, and only one device can connect directly to the gateway. Network management and personalization and Xfinity WiFi Extender use become unavailable. Xfinity CyberSecure is also unavailable, and an already activated WiFi Extender prevents bridge mode from being enabled. Bridge mode does not disable the Xfinity WiFi Home Hotspot on gateways that support that feature. Review Xfinity’s current restrictions before making the change.
To restore routing on an Xfinity gateway:
- Connect the recovery computer to the gateway with an Ethernet cable.
- If the Admin Tool is unavailable, users of supported gateways may need to open the Xfinity app and go to WiFi → View WiFi equipment → Advanced settings → Admin Tool online access, then allow access.
- Open the Admin Tool at
http://10.0.0.1. - Sign in using the administrator credential process that applies to your gateway and account.
- Open Gateway → At a Glance.
- Set Bridge Mode to Disable.
- If you enabled Admin Tool online access, turn it off again in the Xfinity app when finished. Xfinity recommends keeping this access disabled when it is not needed. See Xfinity’s Admin Tool access instructions.
Xfinity’s credential workflow varies by gateway and by when Admin Tool access was enabled. The Admin Tool access control is also not available on every gateway model. Follow the current instructions for your equipment rather than assuming the password printed on the gateway will work.
If bridge mode is unavailable, a supported access point mode may be the better arrangement. NETGEAR documents both approaches for relevant Orbi and Nighthawk equipment, while warning that access point mode disables some router features. See NETGEAR’s double-NAT guidance.
Put the router where Wi-Fi can reach the home
The provider connection may enter through a corner office or utility area, but a separate router does not always have to remain beside the modem. A suitable Ethernet cable can connect the modem or bridged gateway to a more useful router location. Whether you can relocate a router connected to an ONT or receiver depends on the provider’s cabling and installation requirements.
Where practical, place the router:
- Near the center of the areas using Wi-Fi
- Off the floor
- In the open
- Away from cabinets and large obstructions
- Where its power and Ethernet cables can be routed safely
Google gives similar placement guidance for its systems, recommending a central, elevated, visible location when possible. See Google’s placement instructions.
Do not hide the router inside a cabinet merely to make the room look tidier. Walls, furniture, distance, device capabilities, and interference can all affect wireless performance. Google explains these Wi-Fi variables.
Place mesh nodes between good and bad coverage
A wireless mesh node needs a solid connection back to the primary router or another node. Do not automatically put it in the dead zone.
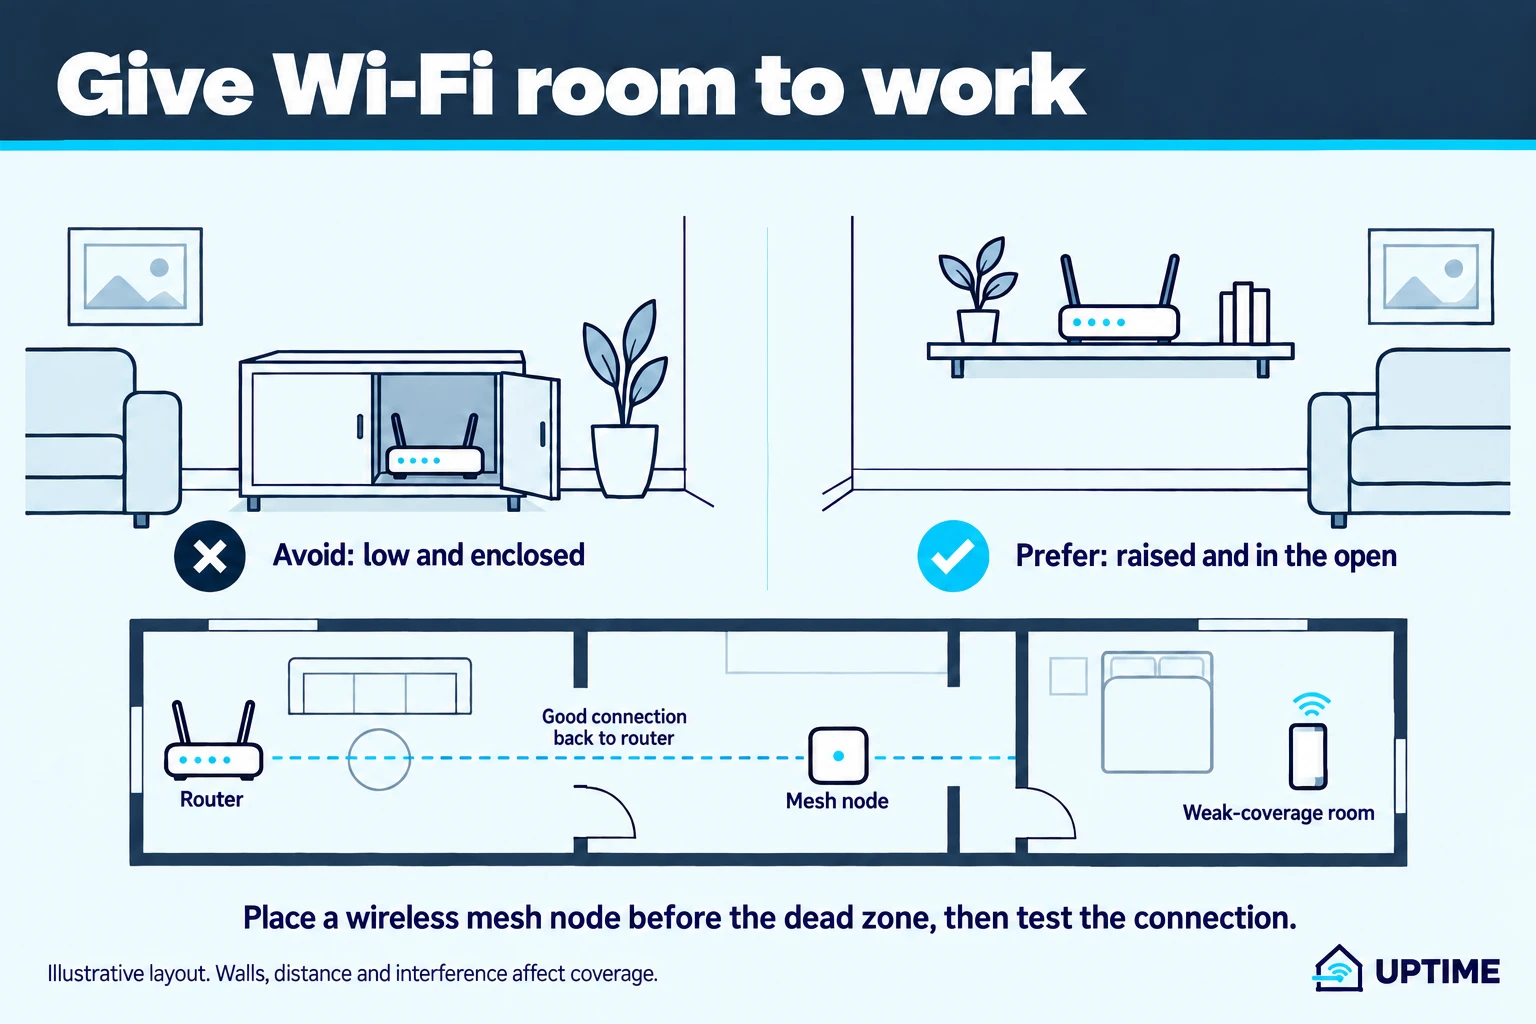
Start about halfway toward the weak area, in an open and elevated position. Run the system’s mesh test if it has one, then move one node at a time. A weak mesh link can itself become unreliable or create a bottleneck. Google’s mesh test guide explains how to check and reposition nodes.
Choose Ethernet and Wi-Fi by need
Wi-Fi is the practical choice for devices that move, including phones, tablets, and most laptops.
Prioritize Ethernet for stationary devices that need consistent latency or sustained transfers, such as:
- Desktop computers
- Game consoles used for online play
- Network storage
- Computers transferring large local files
- Mesh nodes or access points that support wired backhaul
A television or streaming box can also use Ethernet when a cable is easy to install, but it is not mandatory if Wi-Fi already works reliably.
“If it does not move, wire it” is a useful planning shortcut, not an absolute rule. Port speed, cable condition, device support, and the surrounding Wi-Fi environment all affect the result.
Power on and verify the network
For a separate cable or DSL modem and router:
- Turn on the modem.
- Wait until its documented lights show that it has connected to the provider.
- Turn on the router and wait for its internet status to become ready.
- Turn on the switch and connected devices.
Do not rely on one universal two-minute or five-minute timer. Startup times and indicator lights vary by model. NETGEAR’s power-cycle instructions also put the modem before the router and tell users to verify readiness using the device manual. See the documented sequence.
For a combined gateway, follow that gateway’s startup instructions rather than inserting a nonexistent separate-router step. For an ONT, receiver, or another provider-managed connection device, follow the provider’s exact startup and recovery instructions rather than applying the cable or DSL sequence.
Once connected:
- Test a trusted device over Ethernet if possible.
- Test Wi-Fi near the router.
- Test in the room where coverage is usually worst.
- Record download speed, upload speed, latency if available, device used, connection type, location, and approximate time.
- If using mesh, run its node-to-node connection test too.
These results are a baseline, not proof that the network or internet plan is performing perfectly. Repeat unexpected tests under similar conditions and compare wired and wireless results before changing equipment or upgrading service.
Recognize a double-router setup
Double NAT occurs when two devices in series are both acting as routers and performing network address translation.
It may not reduce ordinary Wi-Fi performance. However, it can cause trouble with online gaming, port forwarding, UPnP, or communication between devices on different private networks. A computer connected to one network may be unable to discover a printer on the other. Google explains these limitations.
If you have a provider gateway followed by another router, check the operating mode of both devices. The supported fixes are usually one of these:
- Bridge the provider gateway and keep the downstream router in router mode.
- Keep the provider gateway in router mode and put the downstream equipment into access point mode.
- Remove an unnecessary router.
Do not diagnose double NAT from a slow speed test alone, and do not change modes until you have recovery instructions.
Extender, mesh, or wired connection?
A plug-in extender can be reasonable for one specific weak area. Mesh is designed for broader coverage, but it still depends on good node placement. Neither is guaranteed to fix interference, a failing internet connection, or poor router placement.
Use this order before replacing equipment:
- Move the router into a central, open position.
- Repeat tests in the weak location.
- If using an extender or mesh node, test its connection back to the main router.
- Try a wired connection in the problem room when practical.
- Consider mesh when several areas need coverage and one router cannot reach them reliably.
Do not assume that every extender hop cuts speed by a fixed percentage. Actual performance depends on the product, radio arrangement, placement, interference, and client device.
Decide whether to rent or buy provider equipment
Check your bill for the actual monthly equipment charge. Then compare:
Annual rental cost = monthly rental charge × 12 months
Before buying, confirm:
- The exact model is compatible with your provider and service
- Whether provider activation is required
- Whether voice, television, security, or support features depend on provider equipment
- Who handles replacement if the device fails
- The purchase price and warranty
- How and when rented equipment must be returned
Buying can reduce recurring charges in some cases, but it is not automatically cheaper or simpler. Use your real bill, compatible-equipment list, and expected ownership period rather than a generic rental estimate.
Final setup checklist
- Identify every box by exact model number
- Choose one device to perform routing
- Keep provider-managed ONTs or receivers connected according to provider instructions
- Save settings and recovery instructions
- Change administrator and Wi-Fi credentials
- Update firmware and configure secure encryption
- Count one Cat 6 cable for every planned Ethernet link, plus a modest spare
- Connect a separate modem or confirmed bridged gateway to the router’s internet or WAN port
- If the provider gateway remains the router, use access point mode on supported downstream Wi-Fi equipment
- Put switches behind the device performing routing
- Place the router centrally and in the open where practical
- Put wireless mesh nodes between the router and weak area
- Use Ethernet for stationary, performance-sensitive devices when practical
- Power on equipment using its provider- or manufacturer-documented sequence and readiness indicators
- Record wired, nearby Wi-Fi, and weak-room baseline tests
If the network works near the router but not in distant rooms, investigate placement and coverage first. If both wired and wireless devices are slow, check the provider connection and router status before buying a larger internet plan.
Companion video
Watch the companion video.
See the topic explained on video. Use this written guide for the latest details, sources, and precautions.
YouTube only loads after you press play.

Wi-Fi & Networking
How to Fix Slow Wi-Fi Without Buying Anything
Find out why your Wi-Fi is slow, then test router placement, extenders, bands, channels, and updates before paying for new equipment or a faster plan.

Internet Plans & Speed
How Much Internet Speed Do You Actually Need?
Work out your download and upload needs, compare 100 Mbps with faster plans, and check whether a cheaper internet plan would actually save you money.

Software
Which Browser Privacy Settings Actually Change Tracking
Choose useful privacy controls in Chrome, Edge, Firefox and Safari. Understand tracker blocking, Global Privacy Control and what private browsing does not hide.

About the author
Doni makes home tech understandable.
Uptime turns the answers he gives friends and family into practical public guides. Research assistance and editing tools may be used; claims are checked against named sources and no hands-on testing is implied unless stated.