
How to Fix Slow Wi-Fi Without Buying Anything
Find out why your Wi-Fi is slow, then test router placement, extenders, bands, channels, and updates before paying for new equipment or a faster plan.

 Companion video
Prefer watching? Explore the topic on video.
Before you buy a router or upgrade your internet plan, find out where the slowdown starts. Test the same device beside your router and in the room where Wi-Fi feels worst. If you already have an Ethernet cable and a computer with a network port, add a wired test.
Then work through the free fixes below, keeping only the changes that help. You do not need to change every setting, and you can stop when the connection works where you need it.
This guide expands on the companion video with updated source checks. In particular, extender speed loss is not a fixed percentage, reconnecting does not guarantee a better band, and automatic channel selection is a reasonable default. Follow the tests and precautions here rather than treating the video’s shortcuts as guarantees.
First, find out what is actually slow
Wi-Fi and your internet connection are not the same thing. A speed test over Wi-Fi includes both. A poor result beside the router does not, by itself, prove your provider is the problem.
For a cleaner comparison, pause downloads, backups, and streaming you control. Use the same speed-test service, and the same server if it lets you choose. Avoid testing through a VPN where you can safely disconnect it; leave a work-required VPN alone. Check that a phone is testing your home Wi-Fi, not cellular data. Verizon’s speed-test guidance explains why the device, other traffic, and connection type matter.
Record these three results:
| Test | Where to test | What to write down |
|---|---|---|
| Nearby Wi-Fi | In the same room as the main router | Download, upload, and any stalls or disconnections |
| Problem-room Wi-Fi | Where you normally use the struggling device | The same readings, using the same device |
| Ethernet, if available | A computer connected to a LAN port on the router, with its Wi-Fi off | Whether the wired connection also struggles |
Do not buy an adapter just to complete the table. Without Ethernet, the comparison is still useful, but it cannot fully separate Wi-Fi trouble from an incoming-service problem.
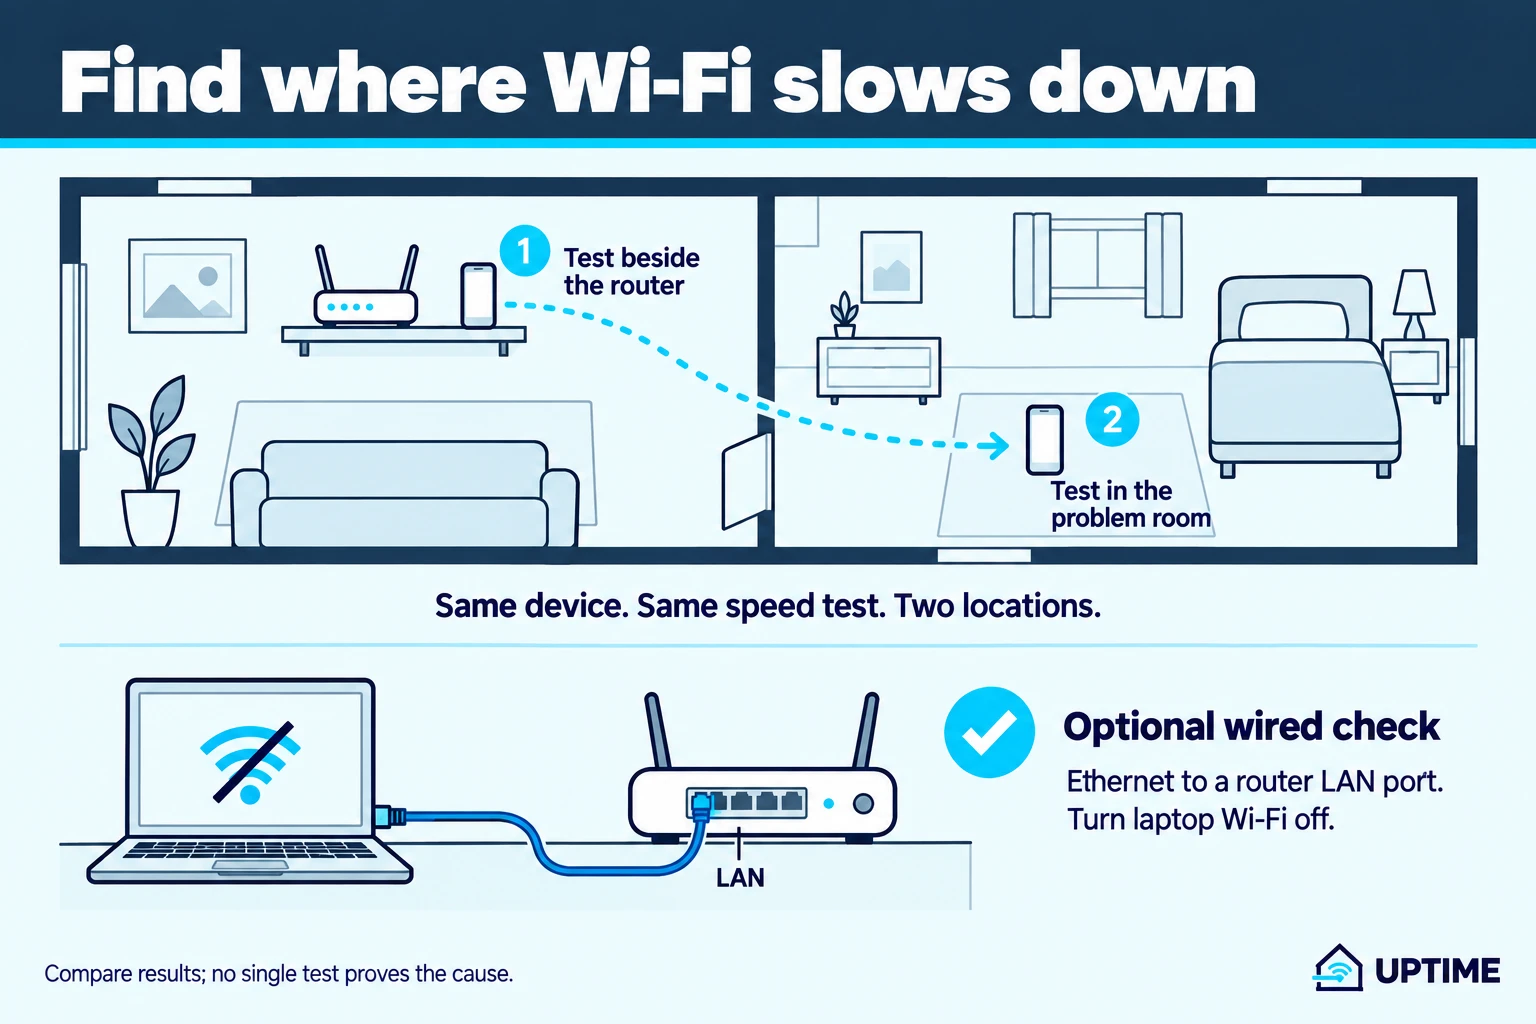
Use the results to choose your next step:
- Fine nearby, poor farther away: Start with placement and the extender check.
- Ethernet works well, but nearby Wi-Fi struggles: Start with the device and wireless settings, not a plan upgrade.
- Ethernet also struggles: Check your provider’s service status and router diagnostics before blaming wireless coverage.
- Only one device struggles: Try another device in the same spot. If it works, start with the affected device’s restart, updates, and built-in network troubleshooter. Microsoft uses this comparison to narrow Windows connection problems.
These are clues, not final diagnoses. Repeat an unusual result before acting on it.
Get the router out of its hiding place
A cupboard may look better than a router. It is not necessarily a better place for one.
Try a more central, open position, raised off the floor, within the reach of your existing cables. Google’s placement guidance for Nest Wifi and Google Wifi favors an exposed shelf or similar position and notes that walls and other obstructions can weaken connections. See Google’s placement advice.
Make this one experiment:
- Note the router’s original position.
- Try one accessible alternative, without stretching cables or blocking ventilation.
- Return to the problem room and repeat your test.
- Keep the new position if it consistently helps. Otherwise, try another practical spot or put it back.
Do not move or disconnect unfamiliar provider equipment just to reach the middle of the house. If the existing wiring gives you no useful alternative, skip ahead. This is a no-purchase troubleshooting pass, not a rewiring project.
Check whether the extender is helping
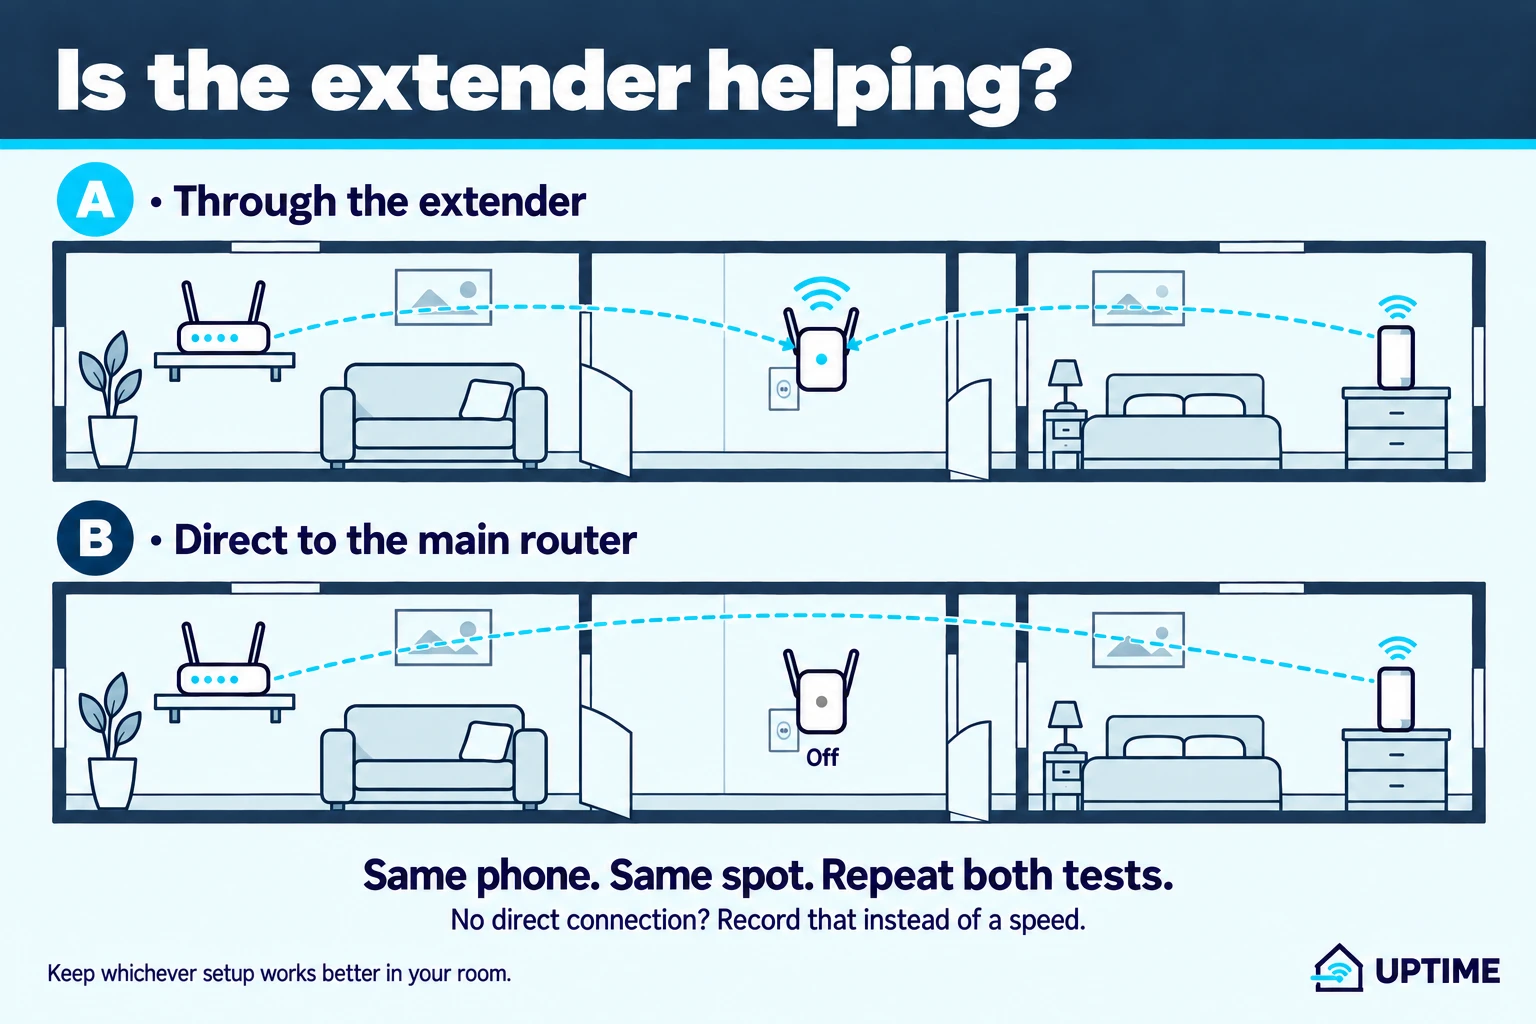
More signal bars are not the same as a faster connection. TP-Link specifically documents cases where an extender improves the displayed signal while download speed becomes worse. Its troubleshooting method compares the same device through the extender and through the router, in the same location. TP-Link’s comparison procedure.
If you already use an extender:
- In the problem room, test while connected through it.
- Temporarily turn the extender off, reconnect to the main router, and test again without moving the device. Expect devices using the extender to disconnect during this check.
- Turn it back on afterward. If you cannot connect directly to the router there, record that instead of treating it as a zero-speed result.
For shared network names, use your equipment’s app to check which access point the device joined, if available. Do not factory-reset anything just to distinguish the connections.
If the extender is still useful, check its placement. It needs a usable connection back to the router, not just proximity to your desk. TP-Link recommends starting roughly between the router and weak area while the router’s signal is still strong, then using the model’s signal indicator to adjust. Extender placement guidance.
Do not calculate your expected speed by halving it for every extender. Compare what your own setup actually delivers.
Before changing router settings
Open the manufacturer’s official app or the management address in your router’s documentation. Save a configuration backup if supported, or privately record the settings you are about to change. Make sure you know how to sign back in. Apple recommends backing up router settings before changing them.
Do not turn off Wi-Fi security to chase a better speed test. Do not use the factory-reset button as a restart shortcut.
Pick a time when a brief disconnection will not interrupt someone’s call or work. Change one setting, reconnect, and retest before touching another.
Try the other Wi-Fi band, if your setup allows it
The band is the radio frequency your device uses. A device on 2.4 GHz is not automatically connected incorrectly: that band can reach farther, and some smart-home devices require it. A router with one network name may use several bands behind that name. Google explains how bands and device selection work.
Already have separate 2.4 GHz and 5 GHz names? Try the 5 GHz connection on a compatible device near the router. Compare both in the problem room rather than assuming the same choice wins everywhere. Return to the original connection if the alternative is worse.
Only see one name? Leave the network names alone. Check the connected-device details in your router app, if it exposes the band. Turning the device’s Wi-Fi off and on is a reasonable reconnect test, but it does not force a particular band or guarantee more speed. Google notes that the client device ultimately decides which band to join.
Do not disable 2.4 GHz across the household just because one laptop can use another band.
Leave channels on Auto unless you have a reason to test
You do not need to find a secret channel number to fix Wi-Fi. Auto is a sensible starting point, not a mistake to correct by default. Apple recommends automatic channel selection and a 20 MHz channel width for 2.4 GHz, particularly around nearby networks. Recommended router settings.
If wireless performance is still poor and your router supports manual channels, a controlled comparison can be worth trying. For a typical U.S. 2.4 GHz network using 20 MHz channels, test 1, 6, or 11. These are the familiar non-overlapping choices; picking an in-between number can introduce overlap. Intel’s channel guide explains the choices. Keep your router configured for your actual country.
Write down the current channel and width first. If the width needs changing, test that separately. Then try one alternative channel, wait for the connection to return, and repeat the problem-room test. Restore the original setting or Auto if there is no consistent improvement.
If the app manages channels automatically and offers no control, skip this step. Leave 5 GHz and 6 GHz on their existing automatic settings during this basic troubleshooting pass.
Restart normally, then check for an update
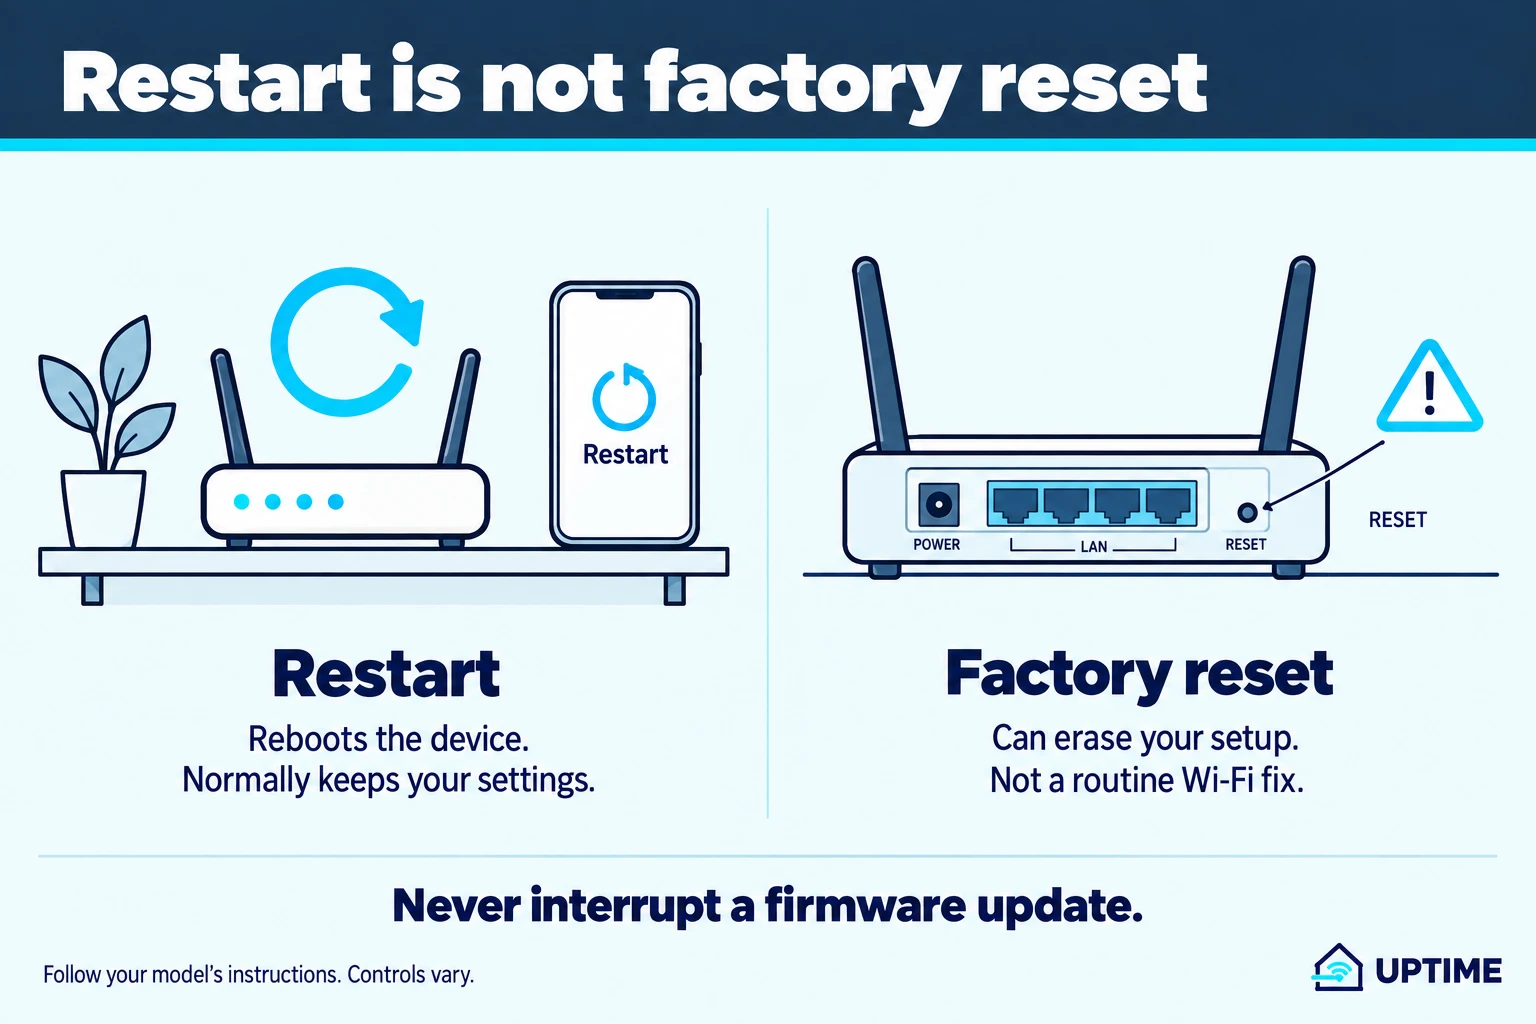
Restart is not factory reset
Use your router’s documented restart command or power-cycle instructions. A combination modem/router is one device; a separate modem and router have a startup order. NETGEAR’s instructions for its cable/DSL setups bring the modem online before the separate router. NETGEAR’s power-cycle procedure.
Follow the timing and status-light guidance for your own equipment. Do not apply cable-modem instructions to a fiber terminal, fixed-wireless receiver, or battery-backed provider device without checking its instructions. Avoid restarting while an update is running.
Once the network is back, test again before changing anything else.
Update carefully, not hurriedly
Firmware is the router’s built-in software. Check for an official update through its app or support page, and follow the instructions for the exact model and hardware version.
For example, TP-Link requires matching firmware to the hardware and purchase region, recommends saving configuration settings, and warns against interrupting power or Ethernet during an upgrade. Its manual-update instructions call for Ethernet unless the device lacks a LAN port. Those details matter more than a generic promise that an update takes five minutes. TP-Link’s firmware instructions.
If your provider manages updates, check its process instead of downloading a lookalike model’s firmware. Let the update finish, confirm the network reconnects, and rerun the same test.
Know when you are done, and when to get help
Return to the room that started all this. Repeat the baseline under similar conditions, then try the actual task: a call, a stream, or the download that kept stalling.
Our suggested rule is simple: keep a change when the benefit repeats, not just when it produces the highest single number. If your connection now does what you need, stop tweaking.
If it still struggles, take the next step that matches the evidence:
- One device, several rooms: Work through that device’s official troubleshooting guide. For a Windows PC, start with Microsoft’s Wi-Fi checks.
- Several devices, one room: Save your nearby-versus-room results and extender observations. They are more useful for the next coverage decision than a screenshot of signal bars.
- Several devices, including Ethernet: Give your provider the times, results, affected devices, and any router diagnostic messages. Ask it to help identify the bottleneck before accepting a plan upsell.
- Unsure how the boxes connect: Use our home-network setup guide to identify the equipment and check the layout.
The goal is not to prove your existing setup can do everything. It is to find out what is wrong before spending money on something that might not fix it.
Before-and-after checklist
- Save the baseline: device, room, connection, time, and test results.
- Record the one change you made and how to undo it.
- Repeat the same test in the same spot under similar conditions.
- Try the actual task that was failing, such as a call or stream.
- Keep the change only if it consistently helps; otherwise restore the previous setup.
- If the problem remains, save the results for the next troubleshooting step or a support call.
Once the connection does what you need, stop. A reliable evening matters more than a record speed-test number.
Companion video
Watch the companion video.
See the topic explained on video. Use this written guide for the latest details, sources, and precautions.
YouTube only loads after you press play.

Internet Plans & Speed
Why a Fast Download Speed Can Still Mean a Bad Video Call
Fast downloads do not guarantee clear calls. Check upload, Wi-Fi, competing traffic and in-call statistics with a repeatable troubleshooting sequence.
Wi-Fi & Networking
How to Set Up a Home Network Correctly
Identify your modem or gateway, connect your router and switch in the right order, secure Wi-Fi, place mesh nodes, and test the finished network.

Internet Plans & Speed
How Much Internet Speed Do You Actually Need?
Work out your download and upload needs, compare 100 Mbps with faster plans, and check whether a cheaper internet plan would actually save you money.

About the author
Doni makes home tech understandable.
Uptime turns the answers he gives friends and family into practical public guides. Research assistance and editing tools may be used; claims are checked against named sources and no hands-on testing is implied unless stated.